


Patching Fire — Guide to Creating A DIY Denim Patchwork Jacket

For Fall 2014, denim aficionados are harkening back to the 1980s with the return of Punky Brewster-style patchwork denim. Trend devotees will likely spend a bundle on designer jeans, vest, and jackets covered with patches nodding to sports teams, emulating rock band logos, and featuring military or tribal motifs, quirky sayings, flowers, smiley faces, cartoon characters, motorcycle club references, and video game imagery.But spending over $200 on a patch-covered jacket seems unwise given that, in the age of DIY pluckiness, you can create your own design, thereby tapping into the fun trend while also creating a very unique garment that you’ll be happy to flaunt for years to come (and that you won’t regret buying if the trend dies down within the year!).
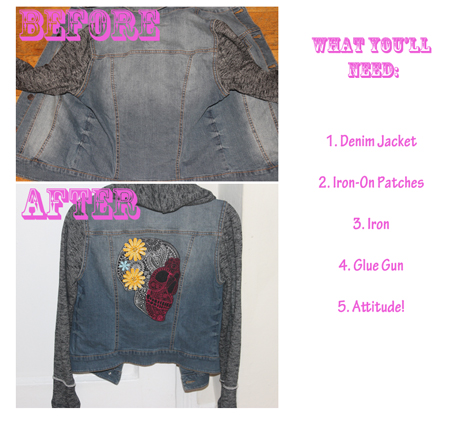
Here’s a look at how to create your own patchwork denim jacket!
Step 1: Find the right jean jacket
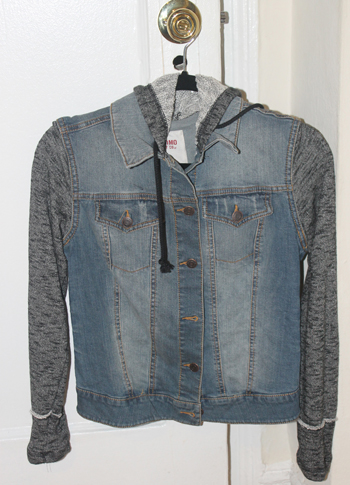

You’ll want a denim jacket that’s affordable, has the type of wash you desire (wether you prefer a deeper, more indigo hue or a more distressed, bleached out tone), possesses as much or as little stitching as you want, and fits nicely. If you plan on applying a lot of patches to the piece, make sure to grab a jacket with denim sleeves. Otherwise, you can do as I did and pick a jacket with contrast sleeves. This is a Mossimo jean jacket that cost me all of $24.99 at Target. It fits nicely, has two front patch pockets, knit sleeves and a matching hood with drawstring cords.
To find an affordable jean jacket, try visiting Target, H&M, Forever 21, or Old Navy —all have pieces for under $50 that will do the trick. You can also use a jacket that’s already in your closet but remember that, by adding these patches, you’re making a pretty big commitment!
Step 2: Find the patches you like

When it comes to patches, you can go for the sew-on or iron-on varieties. Since I can’t even sew a button onto a shirt, I went with the iron-on variety. I found that Etsy is a remarkable resource for patches of all varieties: zodiac signs, national flags, rock band fare (the Rolling Stones, AC/DC, and Nirvana logos, for instance), cartoon characters (Mighty Mouse, Betty Boop,the Powerpuff Girls, Transformers, etc.), retro video game designs (the stars, coins and mushrooms from Super Mario Bros. or Megaman himself, for instance), military grade badges, football team logos, and so forth. I also found some really unique patches: a nostalgic appliqué of a typewriter in a pastel hue, one of a vintage camera with polka dots, a striking phoenix design, and some intricately embroidered sugar skulls.
Since there are so many patch options, it helps to think about how many patches you’d want to apply to your jacket and to come up with a theme, a mood, or a color scheme. In my case, I knew I didn’t want too many patches and, also, that I wanted unexpected designs rather than the typical fare (I steered clear of peace signs, smiley faces, Superman S-shields, and so forth). I originally intended to apply about 3 or 4 patches to the jacket, but I then fell in love with the patch shown here and, when I realized its size, I figured I’d try applying only one patch and see if I wanted to add others later.
The patch shown here is an iron-on sugar skull design by Elsie Michelle Designs that costs $25.It’s a handmade piece with a black felt fabric base that was painstakingly embellished with hot pink and white thread so as to create intricate paisley motifs while still mimicking the teeth, mandible, nasal cavity, and hollow eye sockets of a skull. It was then further adorned with three lace floral appliqués that gave the patch a three-dimensional look and a feminine touch,
When I read the description, I noticed that it measured 9 inches in height and 6 3/4 inches in length, so I knew it would be the primary patch, the one anchoring the design. Before buying the patch, I measured the back of the jacket to ensure that the patch would fit in the central panel along the back, between the stitches seams. Once I realized it did, in fact, fit, I went ahead and ordered it. It’s stunning so, if you’re into Day of the Dead motifs, definitely check out Elsie Michelle Designs on Etsy.
Step 3: Position Patch

Since I only had one patch to apply, finding the perfect placement for it was a no-brainer. However, if you have an assortment of patches, you’ll want to play around with their placement and try different layouts until you settle on your favorite. If you’re working with iron-on patches, once you find the position of choice, you’ll need to remove the label on the underside of the patch (the unadorned side) so as to free the adhesive underneath it.
Step 4: Warm up your iron

Since you’re working with denim, you can set your iron to the highest setting and wait until it’s ready. Do, however, make sure to turn off the steam since you don’t want to run the risk of damaging the embellishment. Clearly, you’ll want to iron on a hard, flat surface. An ironing board is best but if, like me, you never quite bothered with buying that particular household item, you can improvise and settle on a table, desk, bed, or a clean area of floor space.
Step 5: Protect patch during ironing

You never want to press the iron directly against your patches, so make sure to add a protective layer between the two. It’s recommended that you use a pressing cloth but a cotton pillowcase will more than do the trick. Next, press the iron against the pillowcase and let the heat secure that patch. If you run the iron over each section of the patch for 10 to 15 seconds, that should suffice, but it all depends on the size and width of the appliqué. Because of the size of this patch, it actually took me considerably longer — almost 5 minutes to cover the entire surface area. Still, that’s nothing!
Step 6: Glue edges in place

If, like me, you happen to choose a rather large and intricate patch, you may find that some of the edges don’t quite fall flat against the base fabric. Should that happen, you can always grab a glue gun and carefully glue those edges onto the denim jacket, pressing the patch against the denim fabric,
Step 7: Rock your jacket!


Now that your patchwork jacket is complete, you’re ready to rock! This is how my finished jacket looks. I may choose to add a couple of patches along the side panels, but I’ll keep them small and simple since the sugar skull makes such a statement in and of itself.
So what do you think? Are you ready to create a patched-up piece of your own?


